
- Home
-
Store
- Browse All
- SHARED HOSTING
- VPS SERVER
- DEDICATED SERVER
- DATABSE HOSTING
- RESELLER HOSTING
- EMAIL HOSTING
- FTP HOSTING
- Hosting Addons
- SSL Certificates
- Weebly Website Builder
- SiteLock
- Email Spam Filtering
- CodeGuard
- SSL Certificates
- Website Builder
- Website Security
- E-mail Services
- Website Backup
- SEO Tools
- Site Builder
- VPN
- Professional Email
- XOVI NOW
- Register a New Domain
- Transfer Domains to Us
- Announcements
- Knowledgebase
- Network Status
- Contact Us
-
More
Categories
Categories
Tag Cloud
How to Generate a CSR for Apache Web Server Using OpenSSL Print
- How to Generate a CSR for Apache Web Server Using OpenSSL
- 0
1. Log In
Log in to your server’s terminal via Secure Shell (SSH).
2. Run CSR Generation Command
Generate a private key and CSR by running the following command: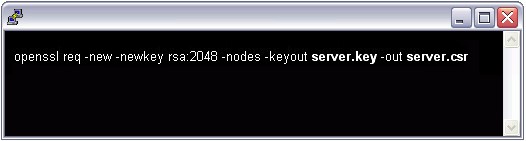 Here is the plain text version to copy and paste into your terminal:
openssl req -new -newkey rsa:2048 -nodes -keyout server.key -out server.csr
Note: Replace “server” with the domain name you intend to secure.
3. Enter your Information
Enter the following CSR details when prompted:
- Common Name: The FQDN (fully-qualified domain name) you want to secure with the certificate such as www.google.com, secure.website.org, *.domain.net, etc.
- Organization: The full legal name of your organization including the corporate identifier.
- Organization Unit (OU): Your department such as ‘Information Technology’ or ‘Website Security.’
- City or Locality: The locality or city where your organization is legally incorporated. Do not abbreviate.
- State or Province: The state or province where your organization is legally incorporated. Do not abbreviate.
- Country: The official two-letter country code (i.e. US, CH) where your organization is legally incorporated.
Note: You are not required to enter a password or passphrase. This optional field is for applying additional security to your key pair.
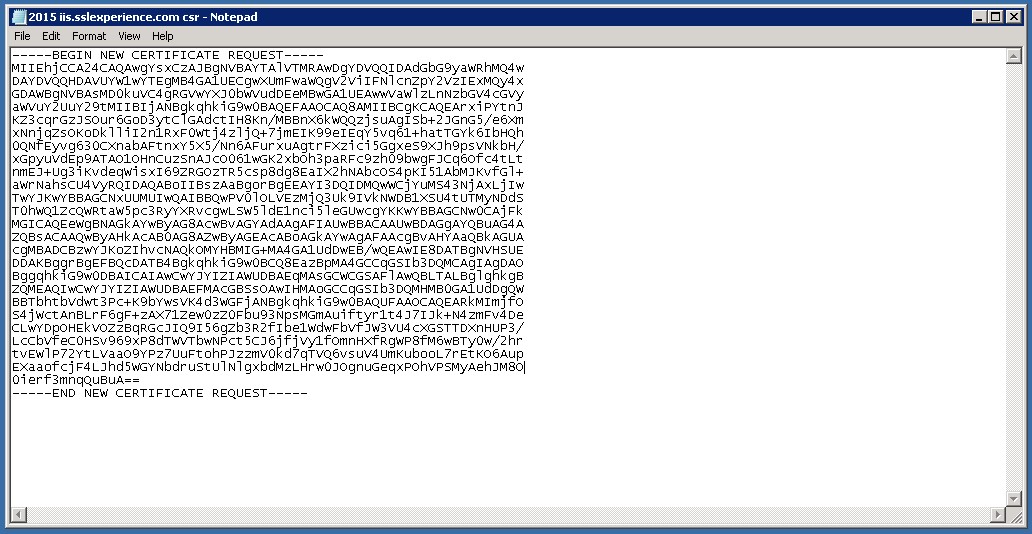
4. Copy the CSR text from the file
Locate and open the newly created CSR in a text editor such as Notepad and copy all the text including:
-----BEGIN CERTIFICATE REQUEST-----
And
-----END CERTIFICATE REQUEST-----
 Note 1: Your CSR should be saved in the same user directory that you SSH into unless otherwise specified by you. Note 2: We recommend saving or backing up your newly generate “.key” file as this will be required later during the installation process.
Was this answer helpful?
Related Articles
Tag Cloud